|
|
|
|
|
|
|
|
|
|
|
|
|
||
|
|
|
|
|
|
|
|
|
|
|||||
|
|
|
||||||||||||
|
|
|
|
|
|
|
||||||||
|
|
|
|
|
|
|
|
|
|
|
|
|
||
|
|
|
|
|
|
|
|
|
|
|||||
|
|
|
||||||||||||
|
|
|
|
|
|
|
||||||||
 Creating
the Hardware
-
page 1 Creating
the Hardware
-
page 1
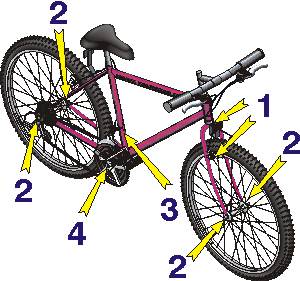
Note: Anytime you need to view a large version of the bike click on the “Big Bike’ icon on the bottom of the following pages. Although the bike looks pretty good so far we need to add in the hardware. There are 4 distinct pieces we need to create.
|
 |
It will be easier to work on a new document and then copy everything to the bike document when we are done. The hex bolts have a 3/8-inch diameter. Choose the polygon tool and set it for a six-sided polygon. Click and drag it across the page holding down the constrain key (Ctrl). Use the property bar to adjust the flat (width) diameter to 0.375. From the Transform Docker rotate 90 degrees and apply a 56.6 percent vertical stretch. |
 |
Turn on snap to objects. Since bolts are chamfered this will serve as a guide only.
|

Home,
About, Contact,
FAQ, Shop,
Products, Services,
Learn, Tips
and Tricks, Tools
© 1997 - 2001 John M. Morris

